
LED dimming using a potentiometer
To control LED dimming using a potentiometer with Arduino, you will need the following components:
- Arduino board (e.g., Arduino Uno)
- LED (Light-Emitting Diode)
- Resistor (appropriate value for the LED)
- Potentiometer (e.g., 10k ohm)
- Breadboard
- Jumper wires
Here are the step-by-step instructions to control LED dimming using a potentiometer with Arduino:
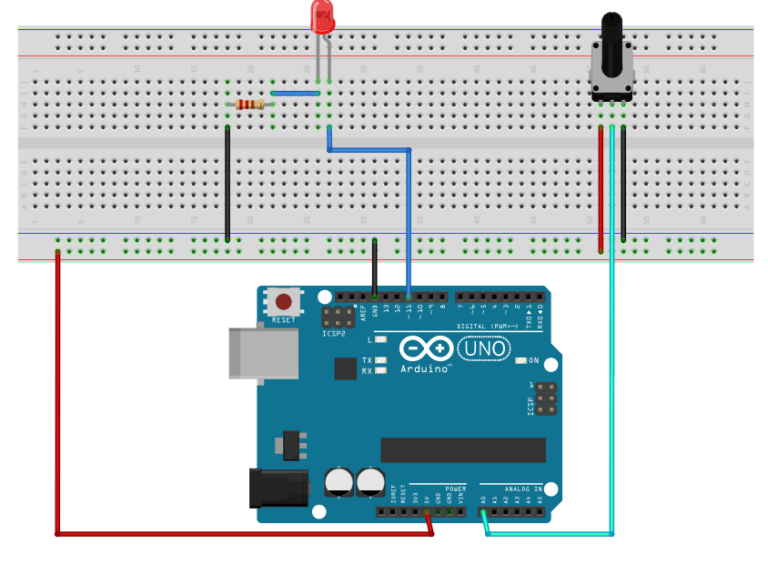
- Connect one leg of the potentiometer (usually the left or right leg) to the 5V pin on the Arduino board.
- Connect the other leg of the potentiometer (usually the right leg) to the ground (GND) pin on the Arduino board.
- Connect the middle leg of the potentiometer (the wiper) to an analog input pin on the Arduino. For example, connect it to analog pin A0.
- Connect the positive (longer) leg of the LED to a digital pin of Arduino with PWM capabilities, For example, connect it to digital pin 11.
- Connect the negative (shorter) leg of the LED to a current limiting resistor. For example, connect it to a 220 Ohm resistor.
- Connect the other end of the resistor to the ground (GND) pin on the Arduino.
Now let’s tackle the programming part:
- Open the Arduino IDE on your computer.
- Write the following code:
const int potPin = A0;    // Analog input pin connected to the potentiometer
const int ledPin = 11;     // Digital output pin connected to the LED

void setup() {
  pinMode(ledPin, OUTPUT);   // Set the LED pin as output
}

void loop() {
  int brightness = analogRead(potPin);    // Read the potentiometer value (0-1023)
  brightness = map(brightness, 0, 1023, 0, 255);   // Map the potentiometer value to LED brightness range (0-255)
  analogWrite(ledPin, brightness);   // Set the LED brightness using PWM
}
- In the Arduino IDE, select the correct board type and port from the “Tools” menu.
- Click on the “Upload” button to upload the code to the Arduino board.