Control an LED
To control an LED using an Arduino Uno, you will need the following components:
- Arduino Uno board
- LED (Light-Emitting Diode)
- Resistor (typically around 220 ohms)
- Breadboard
- Jumper wires
Here are the step-by-step instructions to control an LED using Arduino Uno:
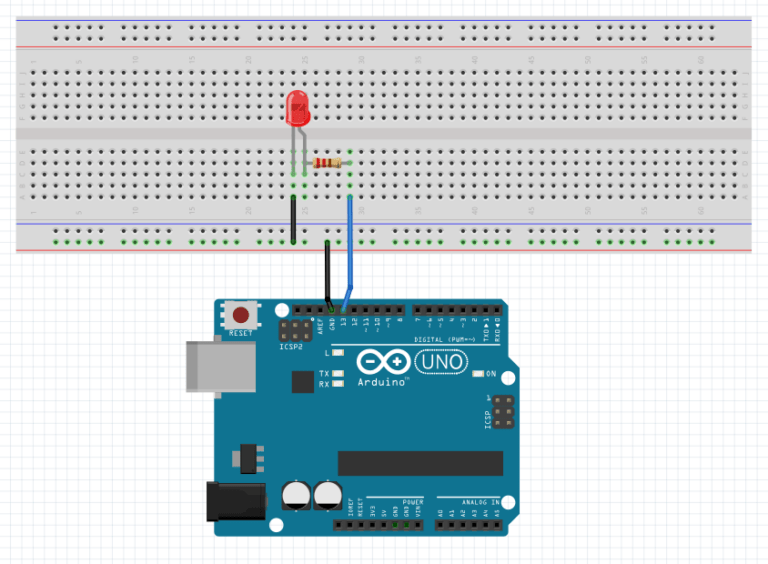
- Place the LED on the breadboard.
- Connect the negative (shorter) leg of the LED to the GND of Arduino. This leg is known as the cathode.
- Place a resistor on the breadboard and connect one end of it to the positive (longer) leg of the LED. This is known as anode.
- Connect the other end of the resistor to the Arduino’s digital pin (i.e. pin 13).
- Connect the Arduino to your computer using a USB cable.
Moving forward, we will now tackle the programming part.
- Open the Arduino IDE on your computer.
- Write the following code:
void setup() {
  pinMode(13, OUTPUT);  // Set digital pin 13 as an output pin
}

void loop() {
  digitalWrite(13, HIGH); // Turn on the LED
  delay(1000);            // Wait for 1 second
  digitalWrite(13, LOW);  // Turn off the LED
  delay(1000);            // Wait for 1 second
}
- In the Arduino IDE, select the correct board type and port from the “Tools” menu.
- Click on the “Upload” button to upload the code to the Arduino board.
- The LED connected to pin 13 will start blinking on and off with a 1-second delay between each state.
That’s it! You have successfully controlled an LED using Arduino Uno. You can modify the code to achieve different blinking patterns or control the LED based on different conditions.